Last month I signed up to join a mystery seed swap. The rules were fairly simple: mail seeds to them and they will mail seeds back to you. I sent a variety of seeds, both saved and retail. I clearly labeled each variety with what it was, if it was saved or retail, and directions for proper growth, along with days until harvest, and any other information that was relevant. I also added $4.50 for return postage. They asked for a minimum of 10 packets to be sent of a variety of seeds, and for each packet to contain at least 15 seeds or 30 seeds for a plant like corn. I sent in around 30 packets of about 10 different varieties.
Here is what I received in the exchange:
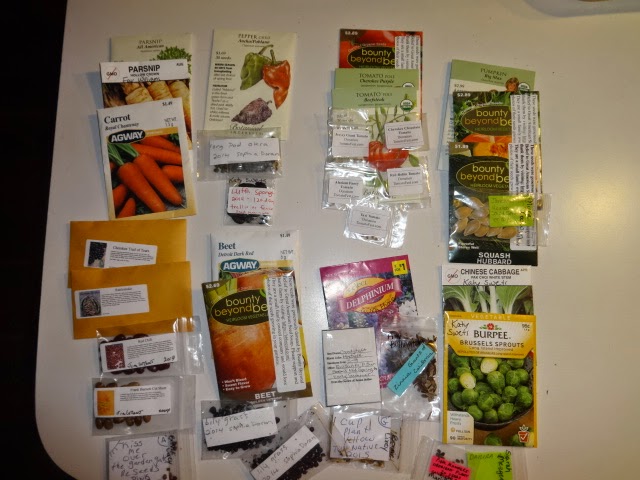
Pumpkin - Big Max, Cinderella, and Jarrahdale
Squash - Hubbard
Chinese Cabbage - Pak Choi White Stem
Brussels Sprouts - Long Island Improved
Beet - Golden Detroit, and Detroit Dark Red
Parsnip - Hollow Crown, and All American
Carrot - Royal Chantenay
Pepper Chile - Ancho/Poblano
Long Pod Okra
Gourd - Luffa Sponge
Beans - Cherokee Trail of Tears, Rattlesnake, Red Chili, and Frank Barnett Cut Short
Tomato - Taxi, Alaskan Fancy, Red Robin, Cherokee Chocolate, Jersey Giant, Beefsteak, Cherokee Purple, and Amish Paste
Flowers - Delphinium, Candytuft, Zinnia Giants of California, Datura Blue, Pink Manners Obedient, Yellow Cup Tall Native, Pink Tall Kiss Me Over The Garden Gate, and two Lily Grass.
I was very excited to see the Jersey Giant tomato seeds in this package. I just tried to order them from Baker Creek and was told they had a failed crop of them last year so they had no seeds to offer.
Can't wait to get these started in the greenhouse I hope to get built in the next month or two. I need to look up some of these plants as not all of them came with planting instructions. Going to have a fun gardening season this year. Once I get my seeds in that I ordered from Baker Creek, I'll go over all I have and make a post about ones I'll be happy to trade and what I'd like to trade for. Maybe just postage, and I'm not sure I will need anything else.
This is a place for me to keep track of and share my gardening experiences, recipes, crafts and various other homesteading adventures. Thanks for checking in and I hope you find some useful ideas on here.
Showing posts with label seeds. Show all posts
Wednesday, February 4, 2015
Monday, September 22, 2014
Spicy Roasted Pumpkin Seeds
I saved all the seeds from one of the pumpkins from my garden. I'll wind up saving them from all the pumpkins, this is just the first one I cut open. These are SO delicious that, now, I feel these pumpkins don't give near enough seeds!
I used a product called Spicy Farm Dust that my husband picked up for me at a tiny little store near where he works. I use it on everything savory, but if you don't have access to it, I'll give you a combination that would taste very similar.
The seeds are really easy to get out of the membrane and it's actually a nice, mindless process. Just scoop up a bit of the pumpkin guts and pick the seeds out. I usually just squeezed the tip of the seed and it just popped right off into my hand.
I put the seeds into a colander and the pulp into a bowl that I later took to the compost bin.
Once I had all the seeds free, I rinsed them under water to get the stickiness off of them and any loose membrane. It's okay if a little bit is sticking to some of the seeds.
Place the seeds in a jar and fill with water to cover the seeds by an inch and add 1 Tablespoon of salt. Stir it around to help dissolve the salt and place a lid on it. Leave it on the counter overnight or up to 24 hours. I'd pick the jar up and give it a little swirl but it would be fine to just leave it sitting.
Once they've sat long enough, drain them into a colander but DO NOT rinse. They need to be spread out to dry a little and you could do this on some parchment paper but I decided to speed the process and used my dehydrator for a couple of hours on 105°F.
Once they were dry on the surface I put them in a mixing bowl and added 1/2 teaspoon olive oil and a few shakes of Spicy Farm Dust*, probably about 1/4 teaspoon. Stirred them well until all the seeds were coated and the seasoning was evenly distributed.
I covered two baking sheets with parchment paper and spread the seeds onto them, trying to keep them from overlapping. I then put them in a preheated 350°F oven for about 35 minutes or until toasted.
They are ready to eat as soon as they come out, or can be cooled and stored in an airtight container.
These are so, so, so GOOD! I was honestly surprised by how much we really like them.
*If you don't have Spicy Farm Dust, and I seriously doubt that you do, you can season with a little season salt and cayenne pepper.
Sunday, July 27, 2014
Dragon Tongue Beans Are Amazing!!
But, anyway, here's the actual topic of this post: Today's Dragon Tongue bean harvest.
These beans are huge and the plants are so proliferate. This is my third harvest and my biggest one so far, but there are many small beans and lots of blooms still on the plants so I know it won't be my last. Also, I want to say that while the beans are huge, they are still very tender when cooked. You can even eat them raw, my grandson ate a handful of them as soon as he picked them.
I'm going to try my hand at pressure canning these today. I've never used a pressure canner and I'll admit I'm more than a little nervous about it. My grandma would use it and had me terrified that it could BLOW at any minute and to stay out of the kitchen. I'm sure that rattling it does will put my anxiety through the roof, but if it doesn't blow up and kill us all then it will all be worth it. If the beans and I survive, I'll make another post on how they turn out. If you don't see another post on it, well, then, you'll know, I suppose.
Just wanted to show another pic of all the beautiful variations you get from this one seed. When they are cooked, sadly all the purple goes away, but you are left with the beautiful creamy color like the one on the right. Another good note, there are zero strings on these, no matter how big they grow. Also, you can leave them on the plant to dry and then use the inner beans like any dried beans. I'd like to do that, but they are so tasty cooked that I don't know if I'll be able to leave any out to dry.
Thursday, June 12, 2014
Starting From Seeds
I prefer to do all my gardening starting with seeds that I start myself rather than plants from a store or greenhouse. I started seeds in the house this past March and while they all came up, the majority of them did not thrive. The only ones that made a successful transplant were many of the peppers, and that was it. I decided to give the tomatoes one more go and dumped all the seeds I had left from all four varieties I'm doing this year into the lid of a Tupperware cake carrier. I marked between the different ones with plastic slats I recycled from a broken mini-blind, and also labeled more of them for each variety. I've transplanted two types to the garden already but it's rained ever since and I haven't been able to plant the other two types, hopefully soon, though.
Even though I was able to transplant several peppers I decided to do the same thing with the rest of those seeds, too. For this container I covered a cardboard box that I'd received in the mail with a kitchen garbage bag and secured it with clear packing tape. I separated the varieties and labeled them using more of the mini-blind slats trimmed to fit.
I have one container of peppers that survived the initial transplant but were really small, so I was waiting for them to grow a little more before putting them in their permanent place in the garden. I think they are ready to go, so whenever it finally stops raining.
I have a pear tree that I started from a seed out of a pear I was eating, and I've never grown a tree from a seed so I'm not exactly sure what to do with it, but I know I need to splint it already.
All the seeds, except for the pear, came from Baker Creek Seeds and I don't think I'll ever buy seeds from anywhere else, I've always been very pleased with everything ever purchased from them, both in quality and quantity. For example, one variety of tomato I was only guaranteed 15 seeds, but I stopped counted seeds after getting to 90! I don't get anything for praising them, I just really like their products.
Subscribe to:
Posts (Atom)